
Chapter 1. Key Benefits of Kendo UI
1.1 Why Kendo
This chapter will answer the question of why kendo UI. It will broadly discuss Kendo UI's benefits, strengths, and major features.
1.2 A comprehensive toolkit of UI widgets & tools for building web sites & applications for desktop computers & touch devices
The totality of Kendo UI parts makes it the most complete set of JavaScript/jQuery widgets and tools, from one source, that runs in the widest range of browsers, on the widest range of hand held devices and computers. Consider that Kendo UI contains 70+ widgets and an extensive set of tools for building JavaScript applications.
1.3 Widgets are jQuery based
The jQuery find-something-then-do-something pattern is likely the most prevalent pattern for working with the DOM today. It is likely impossible to find a developer who is not familiar with jQuery and its plugin architecture (60%+ of leading sites use jQuery). Developers who have never used a jQuery-based UI toolkit, like Kendo UI, will already be familiar with it because of its similarities to jQuery and the jQuery plugin pattern.
With that said, Kendo UI widgets can also be instantiated and controlled outside of the patterns provided by jQuery. One is not locked into jQuery patterns for the life cycle of a Kendo UI widget.
1.4 Kendo UI and jQuery Plug-ins
The jQuery community contains the largest selection of JavaScript plug-ins available for doing front-end development. Just consider, on Github there are 19,257 repository results for the search “jquery+plugin”. As well, the jQuery project itself provides a repository of 2,400+ community plugins.
If Kendo UI doesn't have or do exactly what you want, you legitimately have good options because it's jQuery based. Most any jQuery plugin can run alongside Kendo UI widgets, which are jQuery plug-ins themselves. It’s even programmatically reasonable to pick and choose parts from multiple jQuery UI widget toolkits to be used with Kendo UI with no fuss, overhead, conflicts, or fear of duplicating code (e.g. Bootstrap jQuery Plugins).
1.5 Initialize widgets using imperative or declarative interfaces
Kendo UI widgets can be initialized imperatively using the common jQuery plugin method pattern or declaratively from markup using several options including AngularJS Directives.
1.6 Data visualization widgets Included
Other widget/component toolkits don't always offer or include at no additional cost a robust set of widgets for doing data visualization. Kendo UI includes the following data visualization widgets:
- Area Charts
- Bar Charts
- Box Plot Charts
- Bubble Charts
- Bullet Charts
- Chart API
- Donut Charts
- Funnel Charts
- Line Charts
- Pie Charts
- Polar Charts
- Radar Charts
- Range Bar Charts
- Scatter Charts
- Stock Charts
- Waterfall Charts
- TreeMap
- Sparklines
1.7 Integrated AngularJS Directives
Kendo UI provides official AngularJS directives for initializing widgets the Angular way (i.e. using a declarative interface via directives).
- AngularJS directives started being shipped and maintained as part of
kendo.all.min.jsin the July 16, 2014 Q2 release (i.e. 2014.2.716) - Telerik provides Kendo UI AngularJS integration support for licensed customers
- Kendo officially supports AngularJS v1.3.x
- Be aware AngularJS 1.3 drops support for IE8. AngularJS 1.2 will continue to support IE8, but the core AngularJS team does not plan to spend time addressing issues specific to IE8 or earlier
- Choose AngularJS Data Binding/Routing or Kendo MVVM/Routing, but don't mix these solutions in a single application
- When loading individual Kendo UI files you need to also load
kendo.angular.js(orkendo.angular.min.js) afterkendo.core.js(orkendo.core.min.js) because this file contains the actual directives - Angular 2.0 is on the 2015 Kendo UI road map.
- AngularJS directives are maintained by Telerik, but several integration parts for completing solutions are available from the community. e.g. Backbone, React Meteor.
1.8 In-depth getting started docs and API docs
Kendo UI provides API documentation which details options, methods, and events for each widget or tool. Additionally, above and beyond the API documentation, a Getting Started overview is provided for each widget or tool. Very few commercial solutions provide such a resource (API & Documenation on usage), and if they do, it is nowhere as in depth as what is found in the Kendo UI docs.
1.9 Detailed demos immediately runnable and editable
Each widget contains a plethora of demos (e.g. the grid offers 36+ unique demos), all of which are immediately available to be edited in an official live, online code editor called the Telerik Kendo UI Dojo. This, of course, allows for easy editing and executing of the code as well as the means to copy and paste demo code to other editors quickly.
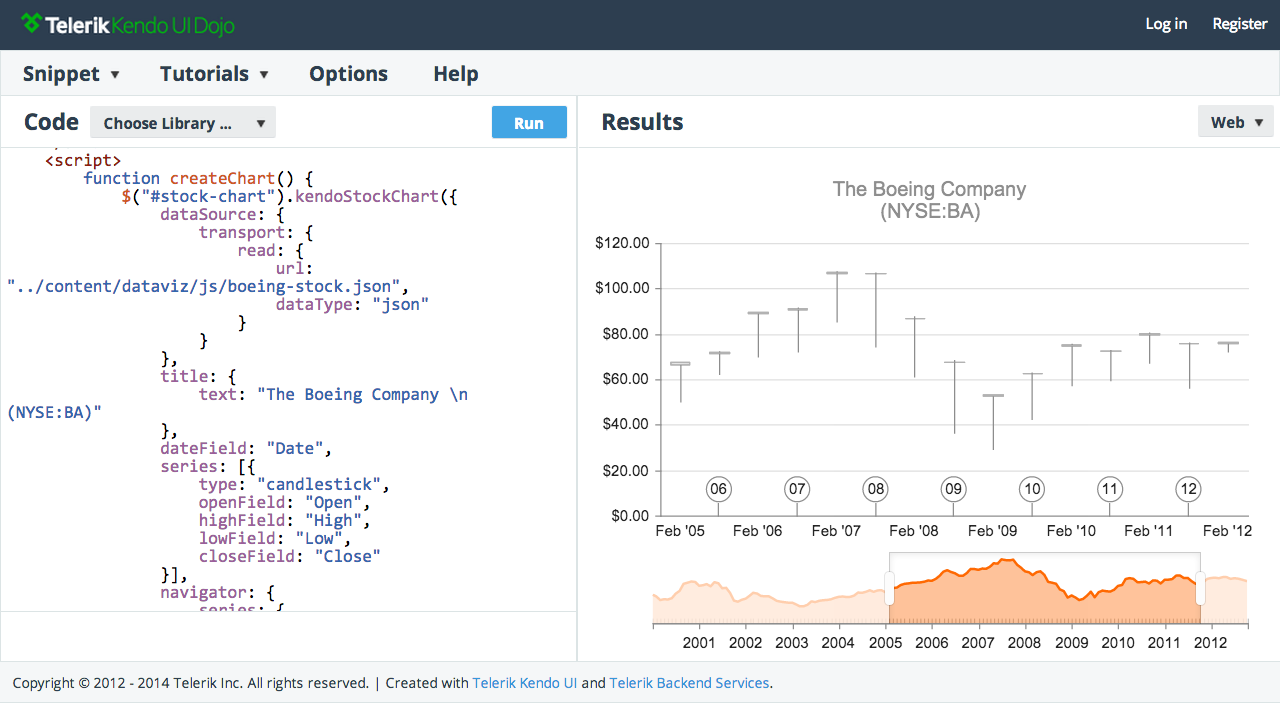
The fact that the demos are immediately editable and runnable in an official online editor sets Kendo UI apart from all of its competitors.
1.10 Chrome DevTools extension to aid development
Telerik offers a Chrome DevTools extension so that a developer can gain information about widget configuration values, widget events, and any global Kendo UI errors that might be occurring during development.
1.11 Out-of-the-box themes and theme builder tools
The Kendo UI Web & DataViz widgets have 15 out-of-the-box themes. As well, each of the themes can be customized using the Telerik ThemeBuilder tool.
The Kendo UI Mobile widgets have 5 platform-specific themes and 1 generic (flat skin). As well, each of the themes can be customized using the Telerik Mobile ThemeBuilder tool.
- The Kendo UI ThemeBuilder (used on Web and DataViz widgets) can be used as a bookmarklet on your own pages.
1.12 Official Bootstrap, SAP Fiori, Office 365, and Material Design theme
Kendo UI widgets can be combined seamlessly with Twitter Bootstrap UI's, SAP Fiori UI's, Office 365 UI's, and Material Design UI's by using the corresponding Kendo UI theme (i.e. Material/Material Black, Bootstrap, Fiori, or Office 365 theme).
1.13 Localized widgets
By default, all widget messages are in English. This can be overwritten by including a language specific kendo.messages.[language here].js file along with your Kendo UI code. Kendo UI offers 20 official language packages or you can create a custom language file with the necessary translations.
- kendo.messages.en-US.js contains all widget messages and may be used as a reference when creating a new localization file. The easiest way to get started is to copy the file, rename it and translate the messages.
- Currently, translations are not available for every language. The full list of currently available translations can be found in the Kendo UI Core repository
1.14 Accessible widgets
Kendo UI Web & DataViz widgets boast the following accessibility features:
Full ARIA support
Following the W3C’s “Widget Design Patterns” in the WAI-ARIA specification, Kendo UI will automatically add WAI-ARIA support when the appropriate role value and additional attributes are needed. For example, examine below the changes made to a number input when it’s converted to a Kendo UI NumericTextBox widget.
The code below shows the initial number input before a Kendo NumericTextBox is initiated:
<input id="amountOwed" type="number" value="17" min="0" max="100" step="1" />
After Kendo UI adds WAI-ARIA support:
<input id="numeric" type="text" value="17" min="0" max="100" step="1" data-role="numerictextbox" class="k-input" role="spinbutton" style="display: none;" tabindex="0" aria-valuemin="0" aria-valuemax="100" aria-valuenow="17" />
Accesskeys
Kendo UI recognizes and preserves accesskey attributes used to activate or focus elements in the page using the keyboard (e.g. in chrome Mac Ctrl + ⌥ Opt + accesskey).
The code below shows the use of an accesskey attribute on an input.
You can verify that Kendo UI honors the accesskey after initialization below:
Right-to-left languages
Kendo UI supports setting up right-to-left languages globally (i.e. an entire application) or on-demand for individual widgets.
In order to enable RTL support include the kendo.rtl.css stylesheet in an html page. The RTL stylesheet should be registered after the common stylesheet and before the theme stylesheet. After the stylesheet is included, wrap your Kendo UI widgets in an HTML element with a .k-rtl CSS class or assign the .k-rtl class to the <body> element to globally declare RTL for the entire application.
                            <!DOCTYPE html>
                            <html>
                            <head>
                            <link rel="stylesheet" href="http://cdn.kendostatic.com/2014.2.903/styles/kendo.common.min.css" />
                            <link rel="stylesheet" href="http://cdn.kendostatic.com/2014.2.903/styles/kendo.rtl.min.css" />
                            <link rel="stylesheet" href="http://cdn.kendostatic.com/2014.2.903/styles/kendo.default.min.css" />
                            </head>

                            <body class=".k-rtl"><!-- global rtl -->

                                <!-- or -->

                                <div id="myKendoUiWidget" class=".k-rtl"><!-- per widget rtl, remove global! -->

                                </div>
                            <script src="//cdnjs.cloudflare.com/ajax/libs/jquery/2.1.1/jquery.min.js"></script>
                            <script src="http://cdn.kendostatic.com/2014.2.903/js/kendo.all.min.js"></script>

                            </body>
                            </html>
Keyboard navigation
The following Kendo UI widgets come pre-wired with keyboard navigation controls:
- AutoComplete
- Calendar
- ComboBox
- DatePicker
- DateTimePicker
- DropDownList
- Editor
- Gantt
- Grid
- ListView
- Menu
- NumericTextBox
- PanelBar
- Slider
- Splitter
- TabStrip
- TimePicker
- TreeView
- Window
A good example of pre-wired keyboard navigations controls can be found on a Calendar. The keyboard buttons defined below can be used on any Calendar by default.
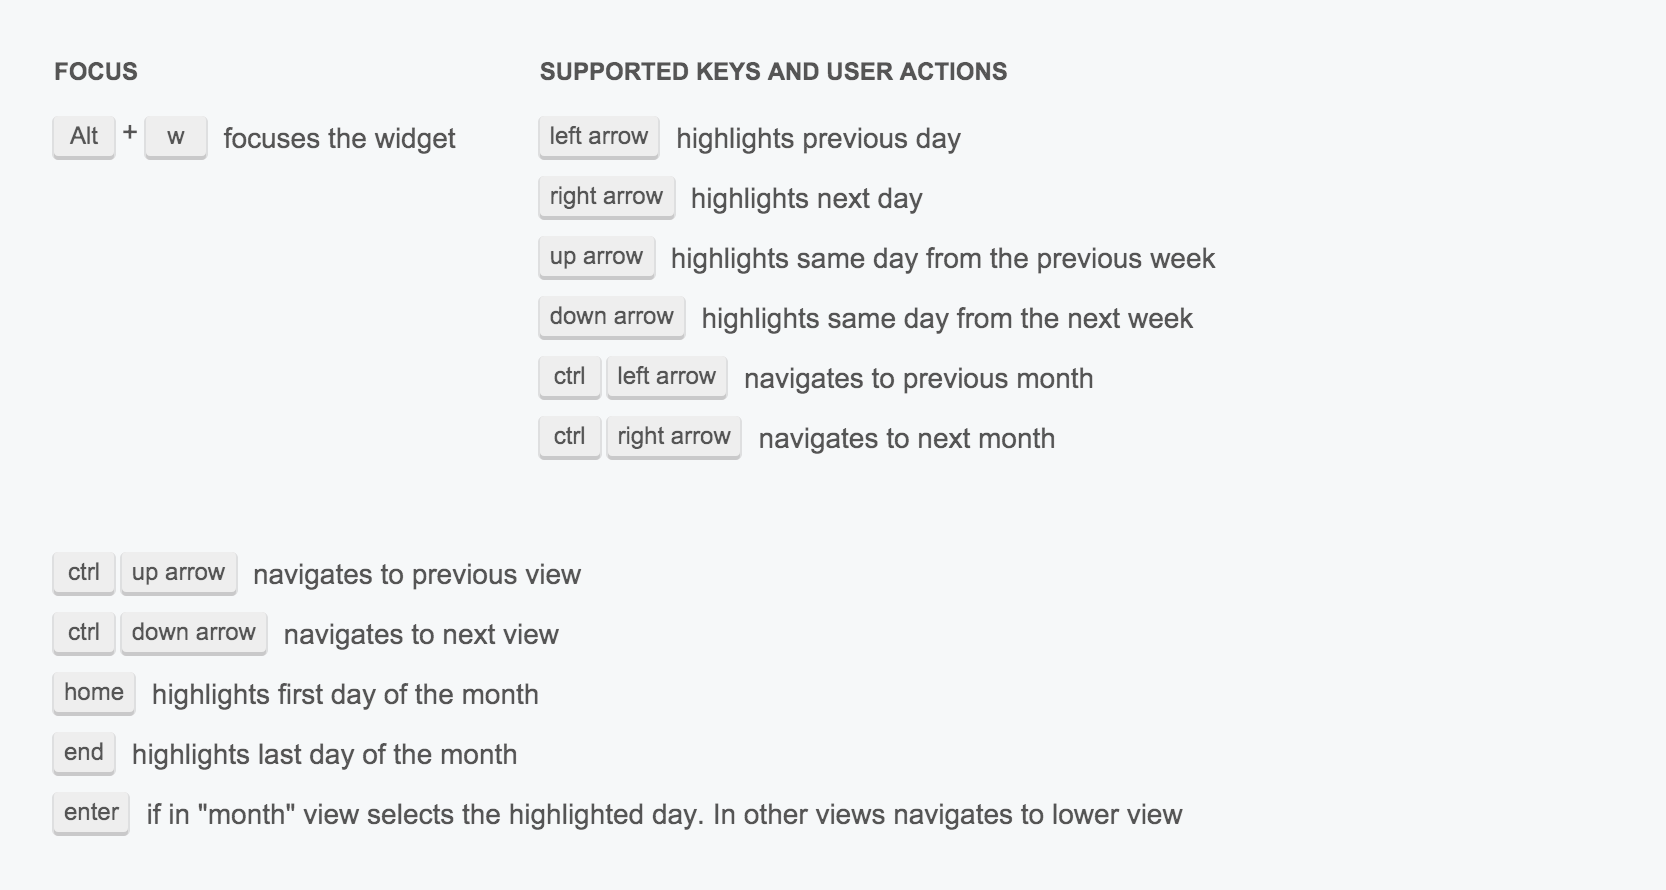
Give it a try (i.e. click on calendar to focus then use the keyboard to navigate the calendar):
JS BinHigh-contrast CSS theme
For users with low vision or other visual disabilities, a high-contrast theme is available for Kendo UI Web, DataViz, and Mobile widgets.
JS Bin- While the vast majority of widgets are accessible, the long-term goal is to provide full WAI-ARI support, WCAG, and Section 508 compliance for all widgets.
1.15 Globalized (i.e. multiple cultures) widgets
Kendo UI provides culture-specific overrides (aka Globalization) for widgets (i.e. Calendar, DatePicker, TimePicker, DateTimePicker, NumericTextBox) that make use of number formats, week and month names, and date and time formats.
JS BinOverriding the default kendo.culture.en-US.min.js file is as simple as including a different culture file and telling Kendo UI to use it with the kendo.culture() method.
                            <script src="http://cdn.kendostatic.com/2014.2.716/js/cultures/kendo.culture.en-GB.min.js"></script>

                            <script type="text/javascript">
                                 //set current to the "en-GB" culture script
                                 kendo.culture("en-GB");
                            </script>
- When globalize.js is registered before Kendo scripts, then Kendo will use globalize.js features instead of Kendo Globalization.
- Kendo provides 355 culture files.
1.16 ASP, JSP & PHP server-side wrappers
The following server-side widget wrappers are avaliable for those who prefer development on the server side.
- ASP.NET MVC - 70+ ASP.NET MVC Components Powered by Kendo UI.
- JSP - 40+ JSP Components Powered by Kendo UI
- PHP - 40+ PHP Components Powered by Kendo UI.
1.17 Built in templating engine
Kendo UI offers a high performance JavaScript templating engine that can be used in the creation of widgets. Or, you can bring your own as well.
1.18 Robust data abstraction
Kendo UI widgets are designed from the ground up to make use of a powerful data abstraction that fully supports CRUD operations (Create, Read, Update, Destroy), and provides support for data sorting, paging, filtering, grouping and aggregates. The abstraction (i.e. kendo.data.DataSource() instances) can use local data (arrays of JavaScript objects) or connect to remote data (web services returning JSON, JSONP, OData or XML) services and API's.
The Kendo UI DataSource has many abilities and responsibilities, including:
- retrieve data from a remote endpoint;
- maintain the structure and type of the data (schema);
- process serialization formats to/from a remote endpoint;
- synchronize updates (i.e. create, update, delete) to/from a remote endpoint;
- maintain an in-memory cache of data (including changes) for updating to a remote endpoint;
- calculate and maintain aggregates, sorting order and paging;
- provide a query mechanism via filter expressions.
- Several of the more sophisticated widgets have their own data abstractions that inherit from
kendo.data.DataSource(e.g.kendo.data.GanttDataSource,kendo.data.HierarchicalDataSource,kendo.data.PivotDataSource,kendo.data.SchedulerDataSource,kendo.data.TreeListDataSource).
1.19 Offline widgets
Kendo UI allows data-bound widgets (i.e. widgets that use DataSource) to function without being online. Users can continue working while offline and data will be stored locally until network connectivity resumes.
1.20 Screen size adaptive widgets
Most Kendo UI widgets will auto resize by default when used in a fluid web page layout (i.e. when widgets wrapper container has a height and width of 100% and is resized) making the widgets themselves drop-in ready for mobile web design strategies. Those widgets that do not auto resize will simply require their resize() method to be called directly or by using kendo.resize() to resize a grouping of widgets.
Additionally, a select few widgets (grid, scheduler, charts, toolbar, tabstrip) will actually adapt to the screensize beyond simply adjusting themselves horizontally in width. Meaning, the widgets UI will adapt, automatically when required by the screen size or view port.
Chapter 2. Kendo UI Overview
2.1 What is Kendo UI
This chapter will give an overview of Kendo UI and its resources.
Briefly in this section I will answer the question of what exactly Kendo UI is, and is not.
Kendo UI, first and foremost, is a comprehensive set of commercial user interface widgets, dependent on jQuery, and written in JavaScript, to be used in the development of web sites/applications that run on the web platform. In short, Kendo UI is a tookit of widgets that provide UI solutions for showing and acquiring data by way of common user interface widget patterns (e.g. data grids, calendar selection, tooltips etc...)
It is not a CSS framework like Bootstrap or, alone, a JavaScript application tool like AngularJS, React, Backbone, or Ember. Kendo UI's purpose isn't too directly compete with any of these solutions. In fact, Kendo UI is intended to augment these solutions with professional grade UI widgets/components.
Kendo UI can be used with anything that runs on the web platform. In this sense you can think of Kendo UI much like a simple jQuery plugin that can augment any front-end website or web application.
In addition to UI widgets Kendo UI also provides some optional and basic tools (aka framework and utilities in the docs) for developing modern JavaScript applications (e.g. MVVM, DataSource, Templates, Effects/FX etc...). Many of these are optionally used in conjunction with the Kendo UI widgets themselves (i.e. templates and DataSource).
While Kendo UI makes a basic offering of tools for building JS applications (MVVM, layout, router, and view), and one could build an entire JS application using just Kendo UI framework tools, its more common that Kendo UI is used in combination with solutions like Backbone, React, Ember, Meteor, or AngularJS.
Kendo UI is designed to run on laptop/desktop web browsers, as well as browsers on touch devices and WebViews used in hybrid mobile application development.
Kendo UI Professional, the commercial version of Kendo used to develop line-of-business and data-centric applications, is divided into the following four parts:
- Web widgets - Common application widgets (e.g. Date Picker)
- Data visualization widgets (AKA DataViz) - Widgets for displaying data visually (e.g Pie Chart)
- Application/framework tools - Tools for developing JavaScript applications (e.g. View, MVVM, Router).
- Mobile widgets & mobile application/framework tools - Mobile/tablet specific widgets and a set of application tools for building browser-based touch applications or hybrid native application in a webview (e.g. ListView).
Kendo UI Core, the free and open sourced foundation that Kendo UI Professional is built upon, excludes the following professional widgets:
- Barcode
- Editor
- Grid
- Map
- QRCode
- Scheduler
- Diagram
- Treeview
- TreeList
- Upload
- Ganntt
- PivotGrid
- All DataViz widgets:
- Mobile widgets, by design, also function on laptop and desktop browsers. This makes responsive, mobile-first UIs trivial to implement on phone and tablet devices, as well as desktop and laptop computers (desktop support for mobile-specific widgets: Chrome Latest, Firefox latest, Opera 15+, Safari 5+, and IE 10+).
- The Web and DataViz widgets are supported on all the obvious modern browsers, but also include full support for IE7+ on Windows XP and Server 2003.
- The Web and DataViz widgets are designed to function on both a mouse-driven and touch-driven interface, and a couple of the web widgets (e.g. Grid and Scheduler) offer an auto-mobile mode (aka mobile adaptive rendering).
- Kendo UI boasts the widest reaching mobile widgets by supporting the broadest range of devices/platforms: iOS 6.0+, Android 2.3+ (In Android 2.3 DataViz widgets support only Canvas rendering mode), BlackBerry OS 10+, Windows Phone 8+, Chrome for Android latest
2.2 Supported browsers
Browser support is broken down into the following three areas:
Web widgets & application/framework tools:
| Browser | Supported versions |
|---|---|
| Internet Explorer | 7 and later |
| Chrome | 21 and later |
| Firefox | 24 and later, ESR |
| Opera | 15 and later |
| OS X Safari | 5 and later |
Mobile widgets & mobile application/framework tools:
| Browser | Supported versions |
|---|---|
| Internet Explorer | 10 and later |
| Firefox | Not supported |
| Others | Same as Core and Web widgets |
DataViz widgets:
| Browser | Supported versions |
|---|---|
| Internet Explorer | 9 and later (Internet Explorer 6, 7 and 8 are supported with limitations, see notes) |
| Chrome | 21 and later |
| Firefox | 24 and later, ESR |
| Opera | 15 and later |
| OS X Safari | 5 and later |
| iOS Safari | 4 and later |
| Chrome for Mobile | 4 and later |
- Internet Explorer 6, 7 and 8 are supported with the following limitations:
- PDF export is not supported.
- Image export is not supported.
- 64-bit versions do not support text rotation.
- Pie and donut charts don't have gradients
- Internet Explorer 10 does not support dashed lines in canvas. This affects the exportImage as well.
- Android 2.x will use non-interactive canvas output
2.3 Supported operating systems
| Operating System | Version |
|---|---|
| Windows | XP and later |
| Windows Server | Server 2003 and later |
| OS X | 10.5 and later |
| Android | 2.3 and later |
| iOS | 6.0 and later |
| BlackBerry | 10.0 and later |
| Windows Phone | 8.0 and later |
| Chrome for Mobile | Any |
2.4 Prerequisite knowledge for learning Kendo UI
As previously mentioned, Kendo UI is a set of HTML widgets driven by JavaScript. It is influenced and takes its cues from JQuery's DOM/plugin patterns as well as the declarative data binding MVVM pattern made popular by Knockout.
Minimally, to get started with Kendo UI, one should have some basic knowledge about HTML, CSS, JavaScript (ES3), and the DOM. Knowledge of jQuery, Backbone, and Knockout, while not required to get started, will certainly make learning Kendo UI easier.
In addition to UI widgets, Kendo UI also offers tools for building JavaScript applications. These tools will require more advanced JavaScript knowledge about MV* patterns, SPAs, and data abstractions.
2.5 Getting Kendo UI Professional code
The Kendo UI professional source code can be obtained by creating a Telerik account and either purchasing a license or using a 30-day trial offer.
If you decide to use a trial of Kendo UI Professional, it will start to download to your local system once you have created a new account from the trial web page. If you have purchased a license, you can go into your account and select from several Kendo UI installation options (i.e. manual, automatic, control panel, Bower package), including creating a custom download/build of Kendo UI.
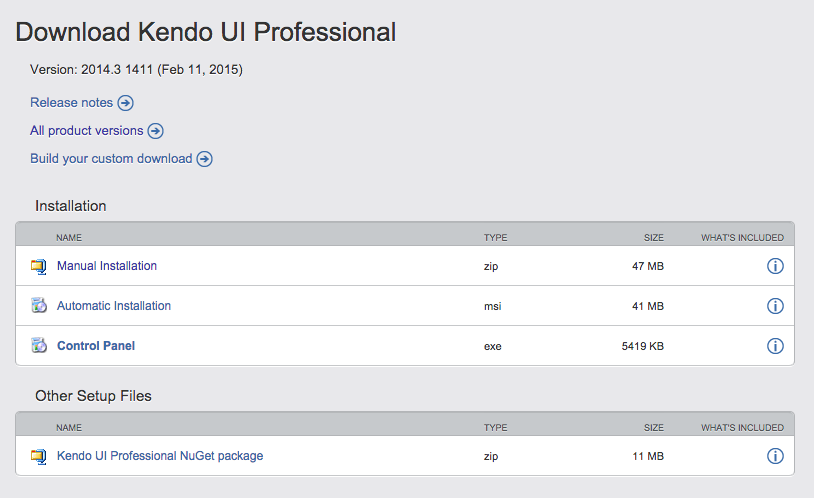
The simplest and fast way to get Kendo UI Professional if you have a license is to download it from your Telerik account product version page and manually install it. For example, in the image below you would click on the "Manual Installation" link in the table, Kendo UI will download, and you would then have access to all of the source files to run Kendo UI.
Once downloaded, and unzipped, you will find a directory with the following sub directories (image below showing professional download, not trial download).
├── README
├── changelog.html
├── examples //demos
├── js // minified JavaScript files
├── license-agreements
├── src //complete source code (not available in the trial)
├── styles //minified CSS, fonts, and images
├── typescript //typeScript definitions
└── vsdoc //Visual Studio Intellisense docs
As a license holder, and depending upon your knowledge and use of Bower, it might be simpler to download and install Kendo UI professional using the Bower package manager.
$ bower install https://bower.telerik.com/bower-kendo-ui.git
You will be asked to give your Telerik account credentials to install Kendo UI professional from the Telerik hosted Bower endpoint. Keep in mind that the directory installed from Bower differs from the directory that can be downloaded from your Telerik account (directory installed from Bower shown below).
├── README.md
├── bower.json
├── js
├── src
└── styles
- The 30-day trial requires signing up for a Telerik account.
- The 30-day trial does not include the
srcdirectory containing source files. - Kendo UI Professional pricing is pretty simple. The starting price for Kendo UI Professional is $699 per developer, royalty-free, with source code included. You also get updates for a year and 10 incident tickets with a 48-hour response time.
- A limited Professional version of Kendo UI is offered as minified code from a public CDN for developers to prototype with before purchasing.
2.6 Getting Kendo UI Core code
The Kendo UI Core code can be obtained in the following five ways:
- Download a zipped archive of the Kendo UI Core github repo
- Git clone the Kendo UI Core github repository
(i.e.git clone https://github.com/telerik/kendo-ui-core.git) - Sign up for a Telerik account and get a zipped directory of Kendo UI Core
- Use Bower to install the Kendo UI Core bower package (i.e.
$ bower install kendo-ui-core) - Use the Kendo CDN to include Kendo UI Core.
Once downloaded (or built using grunt) you will find a directory with the following sub directories.
├── README
├── changelog.html
├── js //minified JavaScript files
├── src //complete Core source code
└── styles //minified CSS, fonts, and images
- Kendo UI Core is free for use by anyone, for anything, and does not contain professional widgets. Yes. This includes commercial use!
- Kendo UI Core is released under the Apache License, version 2.0.
2.7 Kendo UI releases & versions
Kendo UI typically has three major releases in a year (i.e. Q1, Q2, Q3) and several beta and service pack releases in between. The version number is based on the year of the release and the quarter (i.e. 2104.3.XXXX = year . quarter). The last four digits can be used, but not always, to signify the month and date the release occurred (i.e. 2014.3.1114 = 2014 - Quarter 3 - November 14th).
Fro example, most recent release of Kendo UI is version 2105.1.318.
2.8 Kendo UI development status/news
The following resources provide the necessary details around past, present, and current Kendo UI development happenings:
- What's New
- Roadmap
- Release History
- Blog
- Changes and Backwards Compatibility
- Kendo UI on facebook
- Kendo UI on twitter
2.9 Requesting new features, giving feedback, & reporting bugs
New features or feature enhancements can be requested on the Kendo UI UserVoice site.
http://kendoui-feedback.telerik.com/forums/127393-telerik-kendo-ui-feedback
This UserVoice site also facilitates:
- General feedback comments
- The status of upcoming features
- Community up or down voting of feature requests
Additionally, feedback can be sent to the Kendo UI team by creating a Telerik account and using the general feedback form from your account.
Bugs can be submitted for Kendo UI Core on GitHub. A specific bug ticket cannot be submitted to a bug tracking system for Kendo UI Professional parts. To discuss potential bugs found in Kendo UI Professional with the Kendo UI team, use the general feedback form from a Telerik account, or the UserVoice site if you are not a license holder. If you are a Kendo UI license holder, you can also use paid support tickets or the public forums to submit/discuss any Kendo UI bugs.
2.10 API reference (i.e. the programmatic interface documentation for each widget)
All widgets and tools have a detailed API (Application Programming Interface) reference documenting the configuration options, methods, and events for each widget/tool. For example, the API reference for a Menu widget provides the following configuration options, methods, and event details.
- Configuration options (i.e. the options you can pass to a Menu instance):
- Methods (i.e. functions that can be called to change the state of a Menu instance):
- Events (i.e. Menu instance events that can have unique callback functions):
Examine the JavaScript code below demonstrating a few configuration options, methods, and events from the Menu widget API docs.
- Most of the code found in the API reference can be immediately edited in a custom jsFiddle-like editor called "Kendo UI Dojo". Look for the "Edit this example" button on reference pages.
- The Kendo API reference can be contributed to through GitHub.
2.11 Demos and widget documentation
In addition to an API reference, each individual widget/tool has a set of demos and comprehensive documentation. For example, the Menu widget has 13 individual demos, two pages of documentation, and three how-to articles. All of these are specifically focused on demonstrating and documenting the Menu widget alone.
Menu demos:
- Basic usage
- Images
- Direction
- Orientation
- Animation effects
- Events
- API
- Context Menu
- RTL support
- Keyboard navigation
- MVVM
- AngularJS
- AngularJS - Context Menu
Menu documents:
- Overview
- Context Menu
- How To
Each Kendo UI widget/tool comes with this level of demonstration and documentation. To begin learning about a specific widget or tool examine the demos, read the documentation, then turn to the API documentation for implementation details.
- You'll find that each widget/tool minimally offers a demo highlighting the widget's API, events, Keyboard navigation, RTL support, and the widget's associated AngularJS directive.
- The demos can be immediately edited in a custom jsFiddle-like editor called "Kendo UI Dojo". Look for the "Edit this example" button on demo pages to immediately edit demo code in your browser.
- Each demo has a link to the API reference for the widget/tool being demoed. Look for the button on the demo pages that says, "API Reference" to go immediately to the API reference for the widget.
- The Kendo UI API documentation can be contributed to through GitHub.
- The demos are also available in the Trial and Professional downloads—just open the examples/index.html file in a web browser from your local file system.
2.12 Kendo UI Chrome DevTools extension
Telerik offers a Chrome Devtool extension to debug widgets and gain information about configuration values, widget events, and any global Kendo UI errors that might be occurring during development.
Chapter 3. Including Kendo UI Code
3.1 Overview of Including Kendo UI
This chapter clarifies what you'll find in the Kendo UI source code directory and how to include Kendo UI source code in your websites/applications.
3.2 Overview of Kendo UI source code
Regardless of if you are using Kendo UI source code from a Professional download, Core download, or a CDN, the directory structure will contain js and styles directories that could, depending which source you are using, contain the following files (read carefully the highlighted comments).
├── js
│   ├── angular.min.js //version v1.3.0
│   ├── cultures
│   │   ├── ... //355 globaliztion files
│   ├── jquery.min.js //version 1.9.1
│   ├── jszip.min.js
│   ├── kendo.all.min.js //only in Professional download, all Professional widgets in one file
│   ├── kendo.angular.min.js
│   ├── kendo.autocomplete.min.js
│   ├── kendo.binder.min.js
│   ├── kendo.button.min.js
│   ├── kendo.calendar.min.js
│   ├── kendo.color.min.js
│   ├── kendo.colorpicker.min.js
│   ├── kendo.columnmenu.min.js
│   ├── kendo.columnsorter.min.js
│   ├── kendo.combobox.min.js
│   ├── kendo.core.min.js //base kendo file, only use when including widgets individually
│   ├── kendo.data.min.js
│   ├── kendo.data.odata.min.js
│   ├── kendo.data.signalr.min.js
│   ├── kendo.data.xml.min.js
│   ├── kendo.dataviz.barcode.min.js
│   ├── kendo.dataviz.chart.funnel.min.js
│   ├── kendo.dataviz.chart.min.js
│   ├── kendo.dataviz.chart.polar.min.js
│   ├── kendo.dataviz.core.min.js
│   ├── kendo.dataviz.diagram.min.js
│   ├── kendo.dataviz.gauge.min.js
│   ├── kendo.dataviz.map.min.js
│   ├── kendo.dataviz.min.js //only in Professional download, all dataviz widgets in one file
│   ├── kendo.dataviz.mobile.min.js
│   ├── kendo.dataviz.qrcode.min.js
│   ├── kendo.dataviz.sparkline.min.js
│   ├── kendo.dataviz.stock.min.js
│   ├── kendo.dataviz.themes.min.js
│   ├── kendo.dataviz.treemap.min.js
│   ├── kendo.datepicker.min.js
│   ├── kendo.datetimepicker.min.js
│   ├── kendo.dom.min.js
│   ├── kendo.draganddrop.min.js
│   ├── kendo.drawing.min.js
│   ├── kendo.dropdownlist.min.js
│   ├── kendo.editable.min.js
│   ├── kendo.editor.min.js
│   ├── kendo.excel.min.js
│   ├── kendo.filebrowser.min.js
│   ├── kendo.filtercell.min.js
│   ├── kendo.filtermenu.min.js
│   ├── kendo.fx.min.js
│   ├── kendo.gantt.list.min.js
│   ├── kendo.gantt.min.js
│   ├── kendo.gantt.timeline.min.js
│   ├── kendo.grid.min.js
│   ├── kendo.groupable.min.js
│   ├── kendo.imagebrowser.min.js
│   ├── kendo.list.min.js
│   ├── kendo.listview.min.js
│   ├── kendo.maskedtextbox.min.js
│   ├── kendo.menu.min.js
│   ├── kendo.menu.min.js.map
│   ├── kendo.mobile.actionsheet.min.js
│   ├── kendo.mobile.application.min.js
│   ├── kendo.mobile.button.min.js
│   ├── kendo.mobile.buttongroup.min.js
│   ├── kendo.mobile.drawer.min.js
│   ├── kendo.mobile.listview.min.js
│   ├── kendo.mobile.loader.min.js
│   ├── kendo.mobile.min.js //only in Professional download, all mobile widgets in one file
│   ├── kendo.mobile.min.js.map
│   ├── kendo.mobile.modalview.min.js
│   ├── kendo.mobile.navbar.min.js
│   ├── kendo.mobile.pane.min.js
│   ├── kendo.mobile.popover.min.js
│   ├── kendo.mobile.scroller.min.js
│   ├── kendo.mobile.scrollview.min.js
│   ├── kendo.mobile.shim.min.js
│   ├── kendo.mobile.splitview.min.js
│   ├── kendo.mobile.switch.min.js
│   ├── kendo.mobile.tabstrip.min.js
│   ├── kendo.mobile.view.min.js
│   ├── kendo.multiselect.min.js
│   ├── kendo.notification.min.js
│   ├── kendo.numerictextbox.min.js
│   ├── kendo.ooxml.min.js
│   ├── kendo.pager.min.js
│   ├── kendo.panelbar.min.js
│   ├── kendo.pdf.min.js
│   ├── kendo.pivot.configurator.min.js
│   ├── kendo.pivot.fieldmenu.min.js
│   ├── kendo.pivotgrid.min.js
│   ├── kendo.popup.min.js
│   ├── kendo.progressbar.min.js
│   ├── kendo.reorderable.min.js
│   ├── kendo.resizable.min.js
│   ├── kendo.router.min.js
│   ├── kendo.scheduler.agendaview.min.js
│   ├── kendo.scheduler.dayview.min.js
│   ├── kendo.scheduler.min.js
│   ├── kendo.scheduler.monthview.min.js
│   ├── kendo.scheduler.recurrence.min.js
│   ├── kendo.scheduler.timelineview.min.js
│   ├── kendo.scheduler.view.min.js
│   ├── kendo.selectable.min.js
│   ├── kendo.slider.min.js
│   ├── kendo.sortable.min.js
│   ├── kendo.splitter.min.js
│   ├── kendo.tabstrip.min.js
│   ├── kendo.timepicker.min.js
│   ├── kendo.timezones.min.js
│   ├── kendo.toolbar.min.js
│   ├── kendo.tooltip.min.js
│   ├── kendo.touch.min.js
│   ├── kendo.treelist.min.js
│   ├── kendo.treeview.min.js
│   ├── kendo.ui.core.min.js //only in Core download, all Core widgets in one file
│   ├── kendo.upload.min.js
│   ├── kendo.userevents.min.js
│   ├── kendo.validator.min.js
│   ├── kendo.view.min.js
│   ├── kendo.web.min.js //only in Professional download, all web widgets in one file
│   ├── kendo.window.min.js
│   ├── messages
│   │   ├── ... //20 official localized language packs
│   └── pako_deflate.min.js
└── styles
    ├── ... //Bootstrap, Default themes etc... theme specific images & fonts
    ├── images //global images used in CSS files
    │   ├── back.png
    │   ├── kendoui.svg
    │   ├── kendoui.ttf
    │   ├── kendoui.woff
    │   ├── wp8_icons.png
    │   └── wp8_inverseicons.png
    ├── kendo.black.min.css
    ├── kendo.black.mobile.min.css
    ├── kendo.blueopal.min.css
    ├── kendo.blueopal.mobile.min.css
    ├── kendo.bootstrap.min.css
    ├── kendo.bootstrap.mobile.min.css
    ├── kendo.common-bootstrap.core.min.css
    ├── kendo.common-bootstrap.min.css
    ├── kendo.common-material.core.min.css
    ├── kendo.common-material.min.css
    ├── kendo.common.core.min.css //only common CSS, excluding theme CSS, for core widgets
    ├── kendo.common.min.css //common CSS, excluding theme CSS, for all widgets
    ├── kendo.dataviz.black.min.css
    ├── kendo.dataviz.blueopal.min.css
    ├── kendo.dataviz.bootstrap.min.css
    ├── kendo.dataviz.default.min.css
    ├── kendo.dataviz.flat.min.css
    ├── kendo.dataviz.highcontrast.min.css
    ├── kendo.dataviz.material.min.css
    ├── kendo.dataviz.materialblack.min.css
    ├── kendo.dataviz.metro.min.css
    ├── kendo.dataviz.metroblack.min.css
    ├── kendo.dataviz.min.css
    ├── kendo.dataviz.mobile.min.css
    ├── kendo.dataviz.moonlight.min.css
    ├── kendo.dataviz.silver.min.css
    ├── kendo.dataviz.uniform.min.css
    ├── kendo.default.min.css
    ├── kendo.default.mobile.min.css
    ├── kendo.flat.min.css
    ├── kendo.flat.mobile.min.css
    ├── kendo.highcontrast.min.css
    ├── kendo.highcontrast.mobile.min.css
    ├── kendo.material.min.css
    ├── kendo.material.mobile.min.css
    ├── kendo.materialblack.min.css
    ├── kendo.materialblack.mobile.min.css
    ├── kendo.metro.min.css
    ├── kendo.metro.mobile.min.css
    ├── kendo.metroblack.min.css
    ├── kendo.metroblack.mobile.min.css
    ├── kendo.mobile.all.min.css //includes common CSS and all themes in one file
    ├── kendo.mobile.android.dark.min.css
    ├── kendo.mobile.android.light.min.css
    ├── kendo.mobile.blackberry.min.css
    ├── kendo.mobile.common.min.css //common CSS for all widgets, excludes themes
    ├── kendo.mobile.flat.min.css
    ├── kendo.mobile.ios.min.css
    ├── kendo.mobile.material.min.css
    ├── kendo.mobile.meego.min.css
    ├── kendo.mobile.wp8.min.css
    ├── kendo.moonlight.min.css
    ├── kendo.moonlight.mobile.min.css
    ├── kendo.rtl.css
    ├── kendo.rtl.min.css
    ├── kendo.silver.min.css
    ├── kendo.silver.mobile.min.css
    ├── kendo.uniform.min.css
    ├── kendo.uniform.mobile.min.css
    └── textures
        ├── ... //contains texture images referenced in CSS
Several things to note about the Kendo UI source folder structure:
- Kendo UI ships with three third-party libraries, AngularJS, jQuery, and JSZip. This is out of convenience and, while you are not required to use these versions, you should be aware of the versions which are officially supported (Keep in mind that jQuery is the only required third-party library).
- Obviously, the Professional source will differ from the CDN and Core source files and directories. The directory structure I am showing is a combination of all these sources (i.e. not exactly what is downloaded) so you can understand what is offered from each.
- Two strategies for including Kendo UI widgets are possible. The first is simply including bundled files (i.e. kendo.all.min.js) which contains large groupings of widgets in one file. The second option would be to include the
kendo.core.min.jsfile then each individual widget/tool module (i.e. kendo.menu.min.js) and all its dependencies. - The CDN offers the directory structure above excluding non-minified files. The CDN offers the current and past versions of Kendo UI, which should be obvious based on the URLs to the files on the CDN (e.g.
http://cdn.kendostatic.com/2015.1.318/styles/...andhttp://cdn.kendostatic.com/2015.1.318/js/...). Note, that no "the latest" CDN (i.e. not a version, just the latest) endpoint is offered for Kendo UI.
The remainder of this book will show code examples using Professional source code hosted locally or from the CDN. It's assumed from this point forward that the above directory structure is in place regardless of whether the code in the book references the CDN or locally hosted files. The purpose in stating this is so that you realize that the CSS files included in your HTML document will not work correctly without the proper file system placement of the theme, images, and textures directories in relation to the CSS files.
The two code examples below demonstrate the minimally required source files (i.e. two .js files and two .css files) to run Kendo UI. Don't forget that the CSS files will only provide the correct CSS if the theme, images, and textures directories are also properly put on the same file system serving the CSS files (i.e. the CSS dependencies, defined in the CSS files, are relative references).
Running Kendo UI Professional from CDN source code:
<!DOCTYPE html>
<html>
<head>
    <meta charset="utf-8">
    <link rel="stylesheet" href="http://cdn.kendostatic.com/2015.1.318/styles/kendo.common.min.css" />
    <link rel="stylesheet" href="http://cdn.kendostatic.com/2015.1.318/styles/kendo.[PICK A THEME].min.css" />
</head>

<body>


    <input id="datepicker" value="10/10/2011" style="width:150px;" />

    <script src="http://cdn.kendostatic.com/2015.1.318/js/jquery.min.js"></script>
    <script src="http://cdn.kendostatic.com/2015.1.318/js/kendo.all.min.js"></script>


    <script> $('#datepicker').kendoDatePicker(); </script>

</body>
</html>
Running Kendo UI Professional from locally hosted source code:
<!DOCTYPE html>
<html>
<head>
    <meta charset="utf-8">
    <link rel="stylesheet" href="styles/kendo.common.min.css" />
    <link rel="stylesheet" href="styles/kendo.[PICK A THEME].min.css" />
</head>

<body>


    <input id="datepicker" value="10/10/2011" style="width:150px;" />

    <script src="http://cdn.kendostatic.com/2015.1.318/js/jquery.min.js"></script>
    <script src="js/kendo.all.min.js"></script>


    <script> $('#datepicker').kendoDatePicker(); </script>

</body>
</html>
The rest of this chapter will offer more details and options when including Kendo UI CSS files, dependencies, and JavaScript files in HTML documents.
3.3 First, include CSS files
Kendo UI Professional potentially (note: required v.s. optional in code below) can use the following seven css files:
<!DOCTYPE html>
<html>
<head>

    <!-- REQUIRED -->

    <!-- common CSS -->
    <link rel="stylesheet" href="styles/kendo.common.min.css" />

    <!-- CSS theme -->
    <link rel="stylesheet" href="styles/kendo.[SELECT A THEME].min.css" />

    <!-- OPTIONAL -->

    <!-- Right-to-left CSS -->
    <link rel="stylesheet" href="styles/kendo.rtl.min.css" />

    <!-- DataViz common CSS -->
    <link rel="stylesheet" href="styles/kendo.dataviz.min.css" />

    <!-- DataViz CSS theme -->
    <link rel="stylesheet" href="styles/kendo.dataviz.default.min.css" />

    <!-- mobile CSS -->
    <link rel="stylesheet" href="styles/kendo.mobile.common.min.css" />

    <!-- mobile CSS theme -->
    <link rel="stylesheet" href="styles/kendo.mobile.[SELECT A THEME].min.css" />

</head>
<body>

</body>
</html>
Kendo UI Core potentially (note: required v.s. optional in code below) can use the following four css files:
<!DOCTYPE html>
<html>
<head>

    <!-- REQUIRED -->

    <!-- common CSS -->
    <link rel="stylesheet" href="styles/kendo.common.min.css" />

    <!-- CSS theme -->
    <link rel="stylesheet" href="styles/kendo.[SELECT A THEME].min.css" />

    <!-- OPTIONAL -->

    <!-- Right-to-left CSS -->
    <link rel="stylesheet" href="styles/kendo.rtl.min.css" />

    <!-- mobile CSS -->
    <link rel="stylesheet" href="styles/kendo.mobile.common.min.css" />

    <!-- mobile CSS theme -->
    <link rel="stylesheet" href="styles/kendo.mobile.[SELECT A THEME].min.css" />

</head>
<body>

</body>
</html>
3.4 Second, include jQuery dependency
Kendo has one hard third-party dependency on the jQuery JavaScript Library. In order to use Kendo UI in an HTML page you must first include jQuery so that it is loaded before Kendo UI code runs.
<!DOCTYPE html>
<html>
<head>
    <meta charset="utf-8">
    <link rel="stylesheet" href="styles/kendo.common.css" />
    <link rel="stylesheet" href="styles/kendo.default.css" />
</head>
<body>


    <input id="datepicker" value="10/10/2011" style="width:150px;" />

    <!-- load jQuery before Kendo UI -->
    <script src="js/jquery.min.js"></script>

    <!-- load Kendo UI after the browser has loaded and parsed jQuery -->
    <script src="js/[kendo.all.min.js or kendo.ui.core.min.js]"></script>


    <script> $('#datepicker').kendoDatePicker(); </script>

</body>
</html>
Both Kendo UI Professional and Core ship with jQuery 1.9.1. However, Kendo UI is tested and works with jQuery 1.10.x and 2.0.x)
The following list provides jQuery current and historical compatibility information about the major Kendo UI releases:
- Kendo UI 2014.3.1119 (Q3 2014) - jQuery 1.9.1 (also works with 1.10.x and 2.0.x)
- Kendo UI 2014.2.716 (Q2 2014) - jQuery 1.9.1 (also works with 1.10.x and 2.0.x)
- Kendo UI 2014.1.318 (Q1 2014) - jQuery 1.9.1 (also works with 1.10.x and 2.0.x)
- Kendo UI 2013.3.1119 (Q3 2013) - jQuery 1.9.1 (also works with 1.10.x and 2.0.x)
- Kendo UI 2013.2.716 (Q2 2013) - jQuery 1.9.1
- Kendo UI 2013.1.319 (Q1 2013) - jQuery 1.9.1
- Kendo UI 2012.3.1114 (Q3 2012) - jQuery 1.8.2
- Kendo UI 2012.2.710 (Q2 2012) - jQuery 1.7.1
- Kendo UI 2012.1.322 (Q1 2012) - jQuery 1.7.1
- Kendo UI 2011.3.1129 (Q3 2011) - jQuery 1.7.1
- Currently Kendo UI has no plans to stop using jQuery
- If you use jQuery from a third-party CDN in production you should make sure you have a fallback if the CDN goes down.
- Kendo UI has soft dependencies on
angular.min.jsandjszip.min.jsbut soft dependencies are not required to minimally make Kendo UI function.
3.5 Third, included bundled JavaScript files
Minimally, Kendo UI will function (assuming you have included minimal CSS files too) by simply including two JavaScript files in the correct order. One being jQuery and the other being either kendo.all.min.js or kendo.ui.core.min.js, in that order. These two files bundle up all of the available widgets and tools for the respecting Kendo UI versions.
The kendo.all.min.js file bundling up all of Kendo UI Professional widgets and tools and the kendo.ui.core.min.js bundling up all of the Core widgets and tools.
A third JavaScript file could be used to configure Professional or Core widgets when configuring the widgets for a different culture other than the U.S. English culture.
The two code examples below display what an HTML file could potentially resemble in terms of CSS and JS includes for both Professional and Core projects using Kendo UI.
Professional:
<!DOCTYPE html>
<html>
<head>

    <link rel="stylesheet" href="styles/kendo.common.min.css" />
    <link rel="stylesheet" href="styles/kendo.[SELECT A THEME].min.css" />

    <!-- OPTIONAL, only needed if dataviz widgets are used -->
    <link rel="stylesheet" href="styles/kendo.dataviz.min.css" />
    <link rel="stylesheet" href="styles/kendo.dataviz.[SELECT A THEME].min.css" />

</head>
<body>


    <input id="datepicker" value="10/10/2011" style="width:150px;" />

    <script src="js/jquery.min.js"></script>
    <script src="js/kendo.all.min.js"></script>

    <!-- OPTIONAL, only need if you want to override EN US -->
    <script src="js/cultures/kendo.culture.[pick your culture].min.js"></script>


    <script> $('#datepicker').kendoDatePicker(); </script>

</body>
</html>
Core:
<!DOCTYPE html>
<html>
<head>

    <link rel="stylesheet" href="styles/kendo.common.min.css" />
    <link rel="stylesheet" href="styles/kendo.[SELECT A THEME].min.css" />

</head>
<body>


    <input id="datepicker" value="10/10/2011" style="width:150px;" />

    <script src="js/jquery.min.js"></script>
    <script src="js/kendo.ui.core.min.js"></script>

    <!-- OPTIONAL, only need if you want to overide EN US -->
    <script src="js/cultures/kendo.culture.[pick your culture].min.js"></script>


    <script> $('#datepicker').kendoDatePicker(); </script>

</body>
</html>
If you only seek to use the mobile widgets and you have a professional license, then you can use the kendo.mobile.min.js bundled file containing only the mobile widgets:
<!DOCTYPE html>
<html>
<head>

    <link rel="stylesheet" href="styles/kendo.mobile.common.min.css" />
    <link rel="stylesheet" href="styles/kendo.mobile.[SELECT A THEME].min.css" />

    <!-- OPTIONAL, only needed if dataviz widgets are used -->
    <link rel="stylesheet" href="styles/kendo.dataviz.mobile.min.css" />

</head>
<body>


    <script src="js/jquery.min.js"></script>
    <script src="js/kendo.mobile.min.js"></script>

    <!-- OPTIONAL, only needed if dataviz widgets are used -->
    <script src="js/kendo.dataviz.mobile.min.js"></script>


</body>
</html>
Otherwise, if you want to use the Kendo UI Core source code for a mobile project, you will just have to use the kendo.ui.core.min.js, which includes all the Core web widgets as well mobile widgets:
<!DOCTYPE html>
<html>
<head>

    <link rel="stylesheet" href="styles/kendo.mobile.common.min.css" />
    <link rel="stylesheet" href="styles/kendo.mobile.[SELECT A THEME].min.css" />

</head>
<body>


    <script src="js/jquery.min.js"></script>
    <script src="js/kendo.ui.core.min.js"></script>


</body>
</html>
The guide you are reading does not offer specific coverage of mobile widgets in the context of a Kendo UI mobile application using the Kendo UI mobile application framework. If you are going to be using Kendo UI mobile widgets and application tools you should be aware of http://www.kendouimobileguide.com/. However, the nature of a mobile widget is identical to all Kendo UI widgets and mobile widgets can be used outside of the confines of the mobile framework.
- The CDN hosts both the Professional and Core bundle of Kendo UI widgets.
- Professional licenses holders have additional bundled using
kendo.dataviz.min.js,kendo.web.min.js(includes framework tools), orkendo.mobile.min.jsto include only the widgets being used. In other words, if you only make use of web widgets then Professional users can usekendo.web.min.jsinstead ofkendo.all.min.js. - Custom bundles are possible for both Professional widgets and Core widgets. Building a custom bundle can be done for Professional users by way of a online build tool and Core users can create custom Core bundles from using grunt.
3.4 Using individual JavaScript files instead of bundled files
It is possible to include only the JavaScript required to run specific widgets, as opposed to using bundled JavaScript files. In order to include individual widgets and tools replace kendo.all.min.js or kendo.ui.core.min.js with kendo.core.min.js. Then, include the individual widgets .js file, as well as all of the dependencies for the individual widget in the correct order.
The code below demonstrates how to include the minimal amount of JavaScript to use the DatePicker widget and MVVM tools.
<!DOCTYPE html>
<html>
<head>

    <link rel="stylesheet" href="styles/kendo.common.min.css" />
    <link rel="stylesheet" href="styles/kendo.[SELECT A THEME].min.css" />

</head>
<body>


    <input id="datepicker" value="10/10/2011" style="width:150px;" />

    <script src="js/jquery.min.js"></script>
    <script src="js/kendo.core.min.js"></script>


    <script src="js/kendo.data.min.js"></script>
    <script src="js/kendo.binder.min.js"></script>


    <script src="js/kendo.calendar.min.js"></script>
    <script src="js/kendo.popup.min.js"></script>
    <script src="js/kendo.datepicker.min.js"></script>


    <script> $('#datepicker').kendoDatePicker(); </script>

</body>
</html>
- Don't confuse the JavaScript file
kendo.ui.core.min.jswithkendo.core.min.js. Thekendo.ui.core.min.jsfile contains all of the Core widgets whilekendo.core.min.jsis the core JavaScript file required by all widgets. - The documentation provides a list of all widgets and tools that can be included individually and provides a link to a list of dependencies for each.
- Keep in mind that Kendo UI code supports the use of an AMD loader. Use webpack or jspm.io. Including individual widgets/tools and managing their dependencies can quickly become, well, unmanageable depending upon how many individual parts you include and the overlapping similarities between the dependencies. For this reason, if you want to include a large number of widgets and tools individually, you would probably be better off using an AMD loader to manager dependencies.
- Kendo UI does not currently offer support for commonJS loaders. If you want to use Kendo UI in a commonJS environment you'll have to configure webpack, jspm.io, or browserify to deal with Kendo's dependencies.
3.6 Options for including Kendo UI
Kendo UI provides a comprehensive set of options for including Kendo UI in a web page. We've already examined a lot of the options, but you should be aware of all fo them.
You can include Kendo UI in one of the following five ways:
- One JavaScript file - Kendo UI code can be included in a web page using a single JavaScript file, which includes everything (i.e
http://cdn.kendostatic.com/2015.1.318/js/kendo.all.min.js). - Individual source files - The Kendo UI source code is divided into a set of individual JavaScript modules, which have dependencies on each other. These files can individually be added to a web page and the dependencies will have to be managed manually (i.e. by a human!).
- AMD module/dependency loader - Because the source is divided into individual files and these files are wrapped in an AMD definition, a modular loading system such as RequireJS can be used to load and manage Kendo UI dependencies. Using a dependency loader alleviates having to manage dependencies manually, which requires the correct ordering of inline
<script>tags in an html web page. - One custom JavaScript file - Using the Custom Download Tool a custom version of Kendo UI can be downloaded as a single, all in one, file (Note: you must create an account and be logged in to use the Custom Download tool).
- One custom Core JavaScript file - If you use Kendo UI Core, you can build a custom distribution using the grunt build tool by following the instructions in the README.
- Options 1-3 above can make use of local files and or the official CDN.
- To make a custom build of Kendo UI you must create an account and be logged in to use the Custom Download tool.
- Kendo UI Core and Professional can be installed using the bower package manager.
- Both Kendo UI Core and Professional offer minified sourced files as well as minified all in one files in addition to non-minified files (i.e. source files).
Chapter 4. Creating Kendo UI Widget Instances
4.1 Overview of instantiating widgets
A Kendo UI widget can be created (i.e. instantiated) in the following six ways:
- Imperatively using jQuery methods
- Imperative using widget constructors
- Declaratively from markup using
kendo.init() - Declaratively from template markup when a
Viewisrender()'ed to the DOM - Declaratively from markup when binding a
viewModelto a view (i.e. MVVM) - Declaratively from markup in AngularJS applications using directives
This chapter will examine the six ways that a widget can be created and briefly discuss the use of template and DataSource objects as configuration values for widgets.
4.2 Imperatively instantiate widgets using jQuery methods
As previous stated Kendo UI widgets are offered as jQuery plugins. Meaning that they are available as methods of a jQuery instance (i.e. jQuery.prototype.kendo['name of widget']). In the image below you'll notice that the constructor for creating Kendo widgets are all available on jQuery's prototype.

The format of a jQuery widget method name is; "kendo" + NameOfTheWidget in Pascal Case. For example, the auto complete widget method name would be .kendoAutoComplete().
In the code example below the <div> element is selected in the HTML document using jQuery and then the kendoCalendar() method is called to instantiate a calendar widget from the <div>.
Just like most jQuery methods and plugins, Kendo UI methods can be passed arguments (via a single object) to configure the widget being instantiated. In the code example below notice that the calendar widget is being sent the max, min, start, and value configuration options, as well as a callback for the calendar change event.
When creating widgets, you'll need to make sure the correct HTML element is being used (refer to the demos, docs, and api). For example, to create an auto complete widget, the method assumes that it's being invoked on an <input> element, otherwise the widget does not function properly. If the creation of a widget is failing, always verify that the widget is being instantiated on the correct HTML element.
- Kendo UI methods follow the jQuery plugin pattern and return the jQuery object so that additional methods can be chained after invoking a Kendo UI method.
- Calling a Kendo UI method on more than one HTML element will instantiate a widget instance for each HTML element selected.
- Widget options can be updated/set after initial widget instantiation using the
setOptions()widget method.
4.3 Imperatively instantiate widgets using new and constructor
A non-jQuery imperative instantiation option exist that can sidestep jQuery if you prefer using new and having the widget instance returned instead of a jQuery instance.
Non-jQuery developers will be more familiar with the following style of imperative instantiation using the JavaScript new keyword.
- The constructor expects, as it's first argument, an actual reference to a DOM object and not a jQuery object containing a reference to a DOM element.
- The jQuery methods are simply calling constructor functions, which you can directly call imperatively call yourself.
4.4 Instantiate widgets declaratively (from markup) using kendo.init()
Kendo UI offers the kendo.init() function to instantiate widgets from markup. The function instantiates widgets on the passed element argument, and all child elements, with a data-role attribute and value defining what type of widget should be created (e.g. data-role="calendar").
In the code below, I am passing the init() function a reference to the <body> element in the HTML which it uses as the starting point for converting markup to widgets. The <body> element contains <div data-role="calendar"></div> and this element is turned into a Kendo UI calendar when kendo.init(document.body) is invoked.
Multiple arguments can be passed to the init() function. After first passing a DOM reference argument addition arguments can be passed that specificity the kendo.XX.XX namespaces that should be check for data-role instantiation. By default kendo.init() will only instantiate widgets found in the kendo.ui namespace (i.e. not mobile widgets kendo.mobile.ui or DataViz widgets kendo.dataviz.ui).
data-role="" attribute values.
kendo.init($('body'), kendo.ui, kendo.mobile.ui, kendo.dataviz.ui);
- The first argument passed to
init()can be a DOM reference (document.bodyordocument.querySelector('#body')) or a jQuery object (e.g.$('#body')). init()came beforebind(), butbind()can be used in place ofinit()(e.g.kendo.init(element,namespace,namespace)is the same askendo.bind(element,null,namespaces,namespace).- The
data-rolevalue for a widget is the name of a widget in all lowercase. For example, to instantiate akendo.ui.AutoCompletewidget from markup you'd usedata-role="autocomplete". - A widget's configuration options and events can be declared as HTML attributes by changing the camel case configuration name or event name to dash-separated, and then pre-pending with "data-". For example,
data-ignore-case="false"sets the auto complete widget'signoreCaseconfiguration option tofalse. Configuration options which start with "data" do not require an additional "data" in the attribute name e.g. thedataTextFieldoption is set using thedata-text-fieldattribute anddataSourceis set using thedata-source attribute. - Event handlers, set as HTML attribute values will be resolved from a string in HTML (e.g.
data-change="change") to a JavaScript value found in the global scope (e.g.window.changewherechangeis a JavaScript function). - The
templateconfiguration option, set as an HTML attribute value (e.g.data-template="foo"), is used to select a template in the HTML document with that value as itsidvalue. (e.g.<script id="foo" type="text/x-kendo-template"></script>).
4.5 Instantiate widgets declaratively (from markup) using kendo.Views
Kendo UI offers a View abstraction similar to a Backbone view but a little more lightweight. When a View is render()ed, any HTML elements in the view with a data-role attribute and widget name value will get instantiated upon rendering. This is identical to how widgets are instantiated from HTML using kendo.init().
In the code below, an auto complete widget is being instantiated from HTML when the myView View renders the HTML to the DOM.
Don't concern yourself with the details of a View if you are unfamiliar with such an abstraction. Just keep in mind that widgets can be instantiated from markup when the view's markup is being rendered to the DOM.
4.6 Instantiate widgets declaratively (from markup) using MVVM
Kendo UI offers an MVVM (aka Model View ViewModel) pattern, similar to Knockout, that two way binds a model (i.e. the data) to a view (i.e. the HTML) via a viewModel.
Anytime a binding (i.e. kendo.bind(view,viewModel)) occurs, setting up the MVVM pattern, the HTML involved can also be used to declaratively instantiate a widget.
When kendo.bind() is called on the HTML/view it will examine the HTML for data-role attributes and then instantiate widgets as directed by the data-role attribute value.
In the code example below I declaratively setup a slider widget that is created when a viewModel is bound to the view (i.e. kendo.bind($('#view'),viewModel);)
A lot more can be said about using MVVM and widgets together. However, at this point, you just need to realize that instantiating widgets from markup can be accomplished during MVVM data binding and this is an alternative to creating widgets the jQuery way.
- The MVVM pattern can be used within views and with template evaluation.
4.7 Instantiate widgets declaratively (from markup) using AngularJS directives
Kendo UI provides official AngularJS directives for initializing widgets from markup the Angular way using custom element attributes or custom tag names. In the code example below the kendo.directives are injected into the "ctrl" controller aiding the instantiation of a slider widget from the kendo-slider directive found in the HTML.
For more details about using Kendo UI AngularJS directives read the "Using Kendo with AngualrJS" and associating documents.
- Kendo UI officially supports AngularJS v1.3.x
- When instantiating widgets from markup using Angular directives widget, configuration options don't start with "data" they start with "k".
- Be aware AngularJS 1.3 drops support for IE8. AngularJS 1.2 will continue to support IE8, but the core AngularJS team does not plan to spend time addressing issues specific to IE8 or earlier.
- Choose either AngularJS data binding/routing or Kendo MVVM/routing; don't mix the solutions in a single application.
- When loading individual Kendo UI files you need to also load
kendo.angular.js(orkendo.angular.min.js) afterkendo.core.js(orkendo.core.min.js) because this file contains the actual directives.
4.8 Using Template and DataSource as configuration values with widgets
Kendo UI provides standalone abstractions for templating (i.e. template) and data management (i.e. DataSource). Both of these abstractions are decoupled from widgets but are intended to be used in conjunction with widgets as configuration values for widgets. A good deal of the widgets have configuration options that optionally accept template or DataSource instances.
The code example below demonstrates the instantiation of an auto complete widget using both a kendo.template() and a kendo.data.DataSource() instance as configuration values for the auto complete widget.
After getting Kendo UI installed and deciding how you will instantiate the widgets, the next order of business should be to learn, in detail, the ins and outs of the Kendo UI template and DataSource abstractions. I have only briefly introduced them here to communicate their importances as it pertains to creating Kendo UI widgets. Both template and DataSource will be discussed in detail in coming chapters.
Chapter 5. Kendo UI Widget Basics
5.1 Overview of Widget Basics
In previous chapters you learned how to include Kendo UI and create a Kendo UI widget. In this chapter we'll look at what you can do with a widget once you have one instantiated and ready to be managed.
5.2 Getting reference/pointer to widget instance
Once you have created a widget it's likely that you will want to do something with it, even after initially instantiating it with options. For example, you might want to call widget methods, bind/unbind widget events, or destroy the widget instance. In order to accomplish all of this, you will need a reference to the widget instance. Regardless of whether you created the widget using a jQuery method or markup (i.e. via MVVM or Views), you will have to use JavaScript to get a reference to the DOM element the widget was initialized on. Once you have a reference to the original element in the DOM the widget was instantiated on, you can use the .data('kendoNameOfWidget') / .getKendoNameOfWidget jQuery methods or the kendo.widgetInstance() method to gain/return a reference to the actual widget instance.
In the code example below I demonstrate both solutions for gaining a reference to a widget instance.
JS Bin5.3 Calling widget methods
Each widget has a set of methods that are unique to that widget as well some methods that are inherited and available to all widgets. To invoke methods on a widget after instantiation, get a reference to the widget and then invoke any of the methods the widgets instance inherits. Below, I show three examples of grabbing an element from the DOM that an auto complete widget was initialized on, getting a reference to the widget instance, then calling the value() AutoComplete method.
You can reference the API documents for the methods available to each widget.
5.4 Setting & getting widget instance options
A widget can have its configurations options set or updated after instantiation by using the setOptions() method inherited by all widget instances.
In the code example below I am updating configuration options and passing new options to the calendar widget after instantiation using setOptions().
It can be useful to know the current configuration values for a widget before updating it using setOptions(). Most widgets offer an options property on the widget instance object, which is an object containing the configuration options and their current values.
In the code example below I inject all of the options and current values for a calendar widget into the HTML document using the options property.
- As of the 2015.1.318 Kendo UI release
setOptions()works on a limited set of widgets. It's planned for all widgets to fully support thesetOptions()by the end of the year.
5.5 Binding/unbinding widget events
During instantiation, widget events can be configured just like configuration options. In the code below a callback function is configured during instantiation to run any time the change event is broadcast-ed by the widget.
$('#autocomplete').kendoAutoComplete({
    change: function(e){ //define callback for change event
        console.log(e);
    }
});
After a widget is instantiated, in order to set, update, or remove an event you will have to use the bind() and unbind() methods that are inherited by all widget instances.
In the code example below I add two events (i.e. callback functions) to the menu widget using bind() and then use the unbind() method to remove these events when the "remove events" button is clicked.
- A widget can have multiple callbacks assigned to a single event and each callback will be invoked. For example, adding two
closeevents to a menu does not only invoke the lastclosecallback defined. - You can
unbind()a specific callback function as long as you have a way to reference the callback function (i.e. you haven't used an anonymous function). The unbind() method accepts a second argument which is a reference to the specific callback function to be unbound. If you don't specify a callback handler function when usingunbind()all callbacks for the event will be removed.
5.6 Invoke a widget event once
To have a callback function be called only once when a widget event occurs, use the one() widget method to add the event instead of bind().
In the code example below I add two events to a menu widget that run only once and then the callbacks are automatically unbound.
JS Bin5.7 Manually triggering a widget event
Using the widget trigger() method it's possible to manually set off an event on a widget.
In the code example below I manually trigger the click event on a Kendo UI button widget.
5.8 Accessing widget event details and functions
Widget events pass one argument to event callback functions. The argument is called the event object and contains the following event related information and functions:
.sender- a reference to the widget instance that triggered the event.preventDefault()- a method that cancels default event effects on the widget when called in the scope of the callback function.isDefaultPrevented()- returns the boolean value of current state ofpreventDefault()
In the code example below I use the event parameter as a reference to the event object passed to all widget event callback functions to get a reference to the button widget instance and specifically the click event option passed to the button widget.
5.9 Using custom events on widgets
The bind() and unbind() methods are actually inherited from kendo.Observable for each widget. And each widget inherits from kendo.ui.Widget, which directly inherits from kendo.Observable. Because kendo.Observable is just a reusable pattern for listening and firing events on objects, we can use the bind() and trigger() methods to setup custom events on widgets and trigger them.
In the code example below I am adding a custom event called 'foo' to the button widget and then immediately triggering it.
JS Bin- Custom events can't be passed as configuration options at the time of instantiation
5.10 Referencing the top most element that wraps a widget in the DOM
Widget instances have a property called .wrapper that contains a jQuery object selecting the outer most element which wraps the widget in the DOM. For example, if the Grid is initialized from a <div>, the two references match. But if the Grid is initialized from a <table>, then element points to the <table>, while wrapper points to the wrapper <div>.
In the code example below I use the .wrapper property to invoke the jQuery prop() method returning the name of the outer most element that is wrapping the grid.
5.11 Referencing the element the widget was initialized on in the DOM
Widget instances have a property called .element that contains a jQuery object with the element the widget was instantiated on, pre-selected (i.e. already wrapped jQuery sugar). Depending on the widget, it may be visible (e.g. AutoComplete, Calendar, DatePicker, etc.) or hidden (e.g. DropDownList, Upload). A reference to this element is also returned by the initialization statement.
In the code example below I use the .element property to log to the console the name of the element that the grid widget was instantiated on by way of the jQuery prop() method.
- Kendo UI Web and DataViz widget instance keeps references to
elementandwrapper. Kendo UI Mobile widgets have anelementreference only.
5.12 Destroying widgets
Every widget has a destory() method which does the following:
- Deletes the JavaScript widget instance.
- Removes auto-generated HTML content, which is outside the widget, e.g. detached popups, dropdowns, etc. The main widget HTML remains intact and if needed, it should be removed from the DOM manually. The Window widget is an exception, as it represents a detached popup on its own.
- Destroys all child widgets with the help of
kendo.destroy()method. - Prepares the widget for safe removal from the DOM by detaching all event handlers and removes
jQuery.dataattributes to avoid memory leaks.
In the code example below I am creating a button widget which upon clicking will destroy itself and then empty and remove the element the button widget was originally instantiated on (i.e. <button>).
The kendo.destroy() function is offered to destroy multiple widgets with one call. Pass kendo.destroy() a DOM element and all widgets within the DOM element will have their .destroy() method called.
- Destroying a widget does not empty or remove the DOM elements that were in place when the widget was instantiated. One will have to manually remove these DOM elements to totally remove all traces of the widget.
- Creating a new widget instance from the leftovers of a destroyed widget may work, but is not recommended.
5.13 Resizing widgets
If the element a widget is instantiated on has a width and height of 100% then the widget will automatically adjust itself to fill the container, it's contained within. In the code example below I set the width of the <div> that the calendar is instantiated on to 100% and the calendar widget will fill the parent container 100% (i.e the <body> element) and auto adjust as that parent container changes widths.
However, not all widgets will auto resize to the width of the parent element by using CSS to set the element the widget is instantiated to width:100%;. The following widgets do not support auto resizing by CSS when the container is resized.
- All DataViz Widgets
- Mobile Actionsheet
- Mobile ListView
- Mobile ScrollView
- MobileSwitch
- Grid
- Scheduler
- Slider
- Splitter
- Window
In order to adjust the size of non-auto resizing widgets the .resize() method or kendo.resize() function will need to be called to inform these non-auto resizing widget(s) that a resize has occurred. For example, in the code below the chart widget is responding to container resizes by calling the chart .resize() method when the browser resize event is fired.
- Auto resizing or manually resizing widgets mostly pertains to the resizing of a widgets width. Some widgets can respond favorably to height adjustments (e.g. Grid widget) but not all widgets are intended to auto expand both vertically and horizontally (e.g. Calendar widget).
- An undocumented method,
getSize()is inherited by all widgets that will return an object containing the height and width of the wrapper element containing the widget. - The ResponsivePanel, Grid, TreeList, Scheduler, Menu, and SplitView widgets all contain their own unique RWD configurations and auto adjusting features that come into play when a widget is created with the intention of having them adjust to screen size (i.e. 100% width and either auto resizing or manually forcing a resize using
resize()).
Chapter 6 Templates
6.1 kendo.template() overview
This chapter will cover the HTML templating engine included with Kendo UI and its usage with widgets. As well as, using alternative templating engines with Kendo UI widgets. Read this chapter from beginning to end so that you are aware of all the nuances associating with Kendo UI templates and using a templating abstraction with widgets.
The Kendo UI templating engine exist to merge HTML containing Kendo UI hash templating syntax (e.g. #= javascript property #) with JavaScript objects/arrays to produce new HTML containing the data values from the associating JavaScript object. For example, using kendo.template() we can take the HTML:
<div>#= name #</div>
and merge it with the JavaScript object:
{name:'john'}
to produce:
<div>john</div>.
Below I show a complete example of how this would be done in JavaScript using kendo.template().
                            //produces a function, that will return an HTML string, containing values from the object passed
                            var myTemplate = kendo.template('<div>#= name #</div>');

                            //create a new JavaScript string of HTML where #= name # is replaced with 'john'
                            var newHTML = myTemplate({name:'john'}); //= '<div>john</div>'
The engine can be used stand alone, as I just demonstrated. Or optionally, and as intended, by widgets as a configuration value. For example, in the code below I am passing the AutoComplete widget a compiled template function, returned by calling kendo.template() to be used in the creation of the widget.
                                <html>
                                <body>
                                <input id="autocomplete" />
                                <script src="jquery.min.js"></script>
                                <script src="kendo.all.min.js"></script>
                                <script>
                                    $('#autocomplete').kendoAutoComplete({
                                      dataSource: [
                                        { id: 1, name: "Apples" },
                                        { id: 2, name: "Oranges" }
                                      ],
                                      dataTextField: "name",
                                      template: kendo.template('<span><img src="/img/#: id #.png" alt="#: name #" />#: name #</span>')
                                    });
                                </script>
                                </body>
                                </html>
If it's not obvious, by calling the kendo.template() function you are in fact creating another function. This function that is created expects to be passed the object/array containing the data you would like to merge with the template.
The kendo.template() function can be passed two arguments and should be thought of as the function that compiles the template so that the function returned can be called to actually produce the HTML. The first argument passed to kendo.template() is a JavaScript string and the second, optional argument, is an object containing values used to configure the template (i.e. paramName and useWithBlock) for additional performance gains.
Once you have compiled the template the function returned can be passed a JavaScript object or an array. If you pass an array then you'll have to use the default 'data' property in the template to access the array. For example, in the code below expressions data.length and data[i] in the template is used to access the values contained in the data array.
                                <html>
                                <body>

                                <script src="jquery.min.js"></script>
                                <script src="kendo.all.min.js"></script>

                                <script id="template" type="text/x-kendo-template">
                                    <ul>
                                    # for (var i = 0; i < data.length; i++) { #
                                        <li>#= data[i] #</li>
                                    # } #
                                    </ul>
                                </script>

                                <script type="text/javascript">

                                    var template = kendo.template($('#template').html());

                                    var result = template(['bill', 'john', 'steve']);

                                </script>

                                </body>
                                </html>
6.2 Kendo UI hash template syntax
The syntax used in a Kendo UI template is called "hash syntax". It is a very simple syntax and only used to accomplish two things.
First the hash syntax is used to render values from a JavaScript object to an HTML template. This is done by using either the raw value hash syntax #= name # or the HTML encoding value syntax #: name #. In the code example below I contrast these two different ways of placing data into an HTML template.
Second, the hash template syntax # expression # is used to execute JavaScript code/expressions when a template is executed. This syntax is used to identify parts of the template that should be evaluated by a JavaScript runtime. Using the JavaScript expression syntax a routine like looping over a collection of JavaScript values is possible with bare bones JavaScript.
Below I show three examples of templates containing plain JavaScript expressions wrapped with # # syntax. Notice how the hash's wrap the JavaScript expression both at the beginning and the end of the expression regardless of line breaks.
Example 1:
                                <script id="template" type="text/x-kendo-template">
                                    <ul>
                                    # for (var i = 0; i < data.length; i++) { #
                                        <li>#= data[i] #</li>
                                    # } #
                                    <ul>
                                </script>
Example 2:
                                <script>
                                    var template = '#if (foo) {# #= foo # is true #}#'
                                </script>
Example 3:
                                <script id="template" type="text/x-kendo-template">
                                    #if(isAdmin){#
                                        <li>#: name # is Admin</li>
                                    #}else{#
                                        <li>#: name # is User</li>
                                    #}#
                                </script>
Placing JavaScript values in an HTML template and writing JavaScript expressions in the template is the extent of the hash templating syntax. Make sure you are clear on both usages when writing inline or external Kendo UI templates.
- HTML encoding is useful when you want to avoid rendering HTML tags in your templates. It will escape the HTML tags in your data and render the tags as a string.
- If your template includes a literal # character, which is not part of a binding expression and is not a script code marker, then you must escape that character or it will cause a template compilation error. For example, this can happen if a # is used inside a hyperlink URL or a CSS color value. Literal # in Javascript strings are escaped with \\\\#, while literal # in external HTML script templates are escaped with \\#. If your template includes a # character, which is part of a binding expression of a nested template, then this character must be escaped as well. In this way the character will be ignored by the outer template, but will be handled correctly by the inner template.
- Kendo UI opts to use normal JavaScript, instead of adding additional syntax sugar typically found with competing templating solutions, because it makes the templates run faster and you don't have to learn a lot of new syntax. Just use JavaScript.
6.3 Inline v.s. external templates
As we've seen several times already templates can be written as JavaScript strings inline in JavaScript code. For example, the following JavaScript code uses the inline template, #if (name) {# #= name # is available #}#.
                                <html>
                                <body>
                                    <div id="example"></div>

                                    <script src="jquery.min.js"></script>
                                    <script src="kendo.all.min.js"></script>

                                    <script type="text/javascript">
                                        var templateString = '#if (name) {# #= name # is available #}#';
                                        var template = kendo.template(templateString);

                                        $('#example').html(template({ name: 'John' }));
                                    </script>
                                </body>
                                </html>
Using inline templates can be an acceptable solution in some cases for very short and simple templates (e.g. passing a simple template to a widget as a configuration value). For complex templates with a lot of hash syntax or simply for the sake of a modular architecture you'll want to use external templates instead of inline templates.
External templates are not written inline with JavaScript code. An external template is an HTML template define inside of a <script></script> element which has to be in the current/local HTML page (i.e. the DOM) where its being used. In the HTML document blow an external template is shown.
                            <html>
                            <body>

                                <script type="text/x-kendo-template" id="template">
                                <# for (var i = 0; i < data.length; i++) { #>
                                    <li>
                                    <#= data[i].Name #>
                                    </li>
                                <# } #>
                                </script>

                            </body>
                            </html>
Notice that by not using an inline string template, the template does not require JavaScript string quotes or line breaking concatenation using the + operator. By using an external template you are free to format the template however you want without having deal with JavaScript syntax issues.
Using an external template with kendo.template() simply requires getting a JavaScript string version of the template out of the DOM. So based on our previous code example using the external template would require grabbing the contents out of the DOM (i.e. a text node) with something like jQuery's .html() method.
                            <html>
                            <body>
                                <script src="jquery.min.js"></script>
                                <script src="kendo.all.min.js"></script>
                                <script type="text/x-kendo-template" id="template">
                                <# for (var i = 0; i < data.length; i++) { #>
                                    <li>
                                    <#= data[i].Name #>
                                    </li>
                                <# } #>
                                </script>

                                <script type="text/javascript">

                                    var template = kendo.template($('#template').html());

                                    var newHTML = template(['bill', 'john', 'steve']);

                                    console.log(newHTML);

                                </script>
                            </body>
                            </html>
- If you wish to keep templates in an external file, outside of the HTML document where the template is used, then you will have to load the templates at runtime using AJAX, have a task in your build process that in lines the external template to the HTML pages DOM, or use a module loader that handles the loading of templates as text/html into modules.
6.4 Using Kendo UI templates with widgets
The intended purpose of including a templating engine with Kendo UI was to fuel widgets with HTML templates. For example, in the code below I am using the template and valueTemplate configuration options to pass the DropdownList widget two Kendo UI templates. Notice that when passing a widget a template, the combining of the data with the template is left to the widget internals upon instantiation. All you have to do is pass a compiled template to the widget, the widget will create the HTML for you using data from the widgets dataSource.
The following web widgets (DataViz is not being shown) can make use of a compiled template.
- AutoComplete
- ComboBox
- DropDownList
- Editor
- Gantt
- Grid
- ListView
- MultiSelect
- Notification
- Pager
- PivotGrid
- Scheduler
- ToolBar
- TreeList
- TreeView
- Upload
- Validator
- Window
6.5 Using non-Kendo UI templates with widgets
You are not locked into using only the Kendo UI templating engine with Kendo UI widgets. Because widgets accept a function value for template configuration options any templating engine that offers a function that will return HTML with merged data can be used. For example in the code example below the Handlers templating engine is being used in place of Kendo UI's (i.e. Handlebars.compile() can be used in place of kendo.template())
List below are some of the known, modern, templating engines that compile a template into a function, which Kendo UI widgets can make use of without having to create additional functions.
Chapter 7. Configuring A Widgets dataSource
7.1 Widget dataSource configuration Overview
dataSource configuration Overview